Thursday, January 24, 2013

Resin Butterfly Gatefold

This is my entry for Tuesday's Color challenge over at The Outlawz. The colors were Electric Orange, Cherries Jubilee and Haute Pink...and the twist was to make it square.


I fell in LOVE with this color challenge. Every time I see this combination, it makes me happy...it's both Spring and Summer to me. There is a lot to tell, so here it goes. The gatefold card was cut on my Silhouette Cameo using a free cut file from Monica's Creative Room. This lady is amazing, and all of her cut files are free. All card stock is from Stampin' Up! and I used Pumpkin Pie, Cameo Coral and Melon Mambo. I used Spellbinder's classic circle dies for the closure on the gatefold and the background for the focal piece. The flower punches are from Stampin' Up as well, and there are 2 different punches with 3 different flowers on each one. I punched various flowers and matched them all up with white. I distressed each one, sometimes using the opposite color on the white card stock than what it is matched with. A couple of the flowers on the right were placed to hold the card closed. The bling surrounding the circles was origially a one piece circle, but it was too small to fit around my dies, so I cut it apart and placed it around the edges. It was also clear, and I colored it with R43 Copic marker. Some of the bling in the center of the flowers are goosebumps from Queen & Co. and the others are just crystals, from the same company. I added orange and pink bling in each of the holes along the top of the card (which you can't see because I covered them) that were cut from the design. Since the holes are open in the back, I used my embossing buddy to deactivate the exposed adhesive. The center piece is clear resin that I made using a mold. I colored the various parts with my Copic markers to make them match the card. The resin piece was then put into a silver jewelry tray to give it a frame. I also use these trays to make the resin pieces into necklaces.

Thank you so much for visiting my blog!

Susan


Monday, January 21, 2013

Mousework?

This is my entry for Sunday's CAS challenge over at The Outlawz. The twist this week is Tea Time.


This was a really fun card to make. I just received this set a couple weeks ago, and couldn't wait to use it. All images and the sentiment are from Gina K. Design's Purr-fectly Delightful stamp set. The frame is the negative space from a cut file I cut on my Silhouette Cameo using black card stock. I haven't made a card with the actual item yet, but I love using the negative pieces that are leftover. I stamped the kitten in a tea cup on white card stock and colored it using Copic markers. Then placed the black frame on top. The "thought bubble" is a sticker and I stamped the mouse inside it and then colored everything with Copics. I love how the little kitten is just thinking about that mouse...lol. I added crystals to the middle of the two flowers and layered everything on yellow card stock. 

Happy Birthday Kitty

This is my entry for Saturday's Paper Ala Mode challenge over at The Outlawz - Bright Colors is the twist this week.


The frame for this card is actually the negative space from a cut file purchased from Silhouette America's online store. The frame was cut using florescent green and hot pink card stock. The image and sentiment are from Gina K. Design's Purr-fectly Delightful set. The butterfly is a Cheery Lynn die and I cut 3 images...2 in florescent green and 1 in hot pink and stacked them on top of each other and added hot pink bling. The kitten was colored using Lycra Skin Tone colored pencils. The frame was layered on white card stock and florescent green bling was added on the edges.

Pick An Age

This is my entry for Friday's Copic/Promarker challenge over at The Outlawz. The twist is Milestone Birthdays.


What better way to celebrate a milestone birthday, than to pick your own age? The image and sentiment are from Art Impressions. The image is colored with Copic markers. I used Spellbinder's classic ovals in 3 sizes for the image, the black mat and the designer paper. Those are layered on white card stock, distressed with yellow ink, the black card stock and then Pacific Point card stock from Stampin' Up! I added 2 different sizes of blue crystals along two edges.

Friday, January 18, 2013

Ride 'em Cowboy

This is my entry for this week's Twisted Thursday challenge over at The Outlawz. This week's twist was make it masculine.


This is another metal smithing card done using copper metal and a metal smithing template I purchased from Dick Blick. I chose to rough up the metal on the entire piece this time. The rope frame was cut using my Silhouette Cameo and a cut file from their online store. Metal smithing is a lot of fun. You place the metal securely around the mold and using various plastic tools, you burnish the piece until the entire outline shows. You could leave it just like that, or you can then distress it using other metal tools. You can scratch it or sand it to remove the top color and reveal the silver underneath. I used some rubbing creams to highlight a few of the items after sanding. I then placed the rope frame on top and cut away the excess metal. This was then layered on a piece of distressed brown card stock. I used the Tim Holtz distressing tool to rough up the edges and I rolled them a little on the corners. The cowboy hat is a piece of black chipboard that was then distressed using a couple of different acrylic paints to give it a faux leather look. I added jute around the hat and then made it into a lasso to bring it to the other corner. I had these two little horseshoe charms that I removed the top from and distressed with a copper pen.

My Valentine

This is my entry for Wednesday's Sketch challenge over at The Outlawz.


The card base was cut on my Silhouette Cameo. I also cut an extra set of hearts on designer paper from my stash. I added the textured card stock behind the cut to complete the card. The valentine stamp is from Paper Inspirations and it was stamped and embossed in Azurite embossing powder from Stampendous. I distressed the edges of the card and popped and offset the designer paper hearts on top of the cut hearts. I added swirly bling along the edges to complete the sketch. The swirly bling was separated from a larger piece and was originally clear. I colored it with a Copic marker (bg09) to match the two round crystals that were already this color.

Thursday, January 17, 2013

Purple UTEE Flower

This is my entry for Tuesday's Color challenge over at The Outlawz. The challenge colors were green, purple and cream...and the twist was to use fibers.


All of the card stock used for this card is from Stampin' Up! The flower is designer paper, dipped in UTEE (Ultra Thick Embossing Enamel). You melt the UTEE in a melting pot by Ranger. I used a punch to cut out a 3-petal flower. I then used purple ink to distress the edges and then it gets dipped into the UTEE. You use tweezers to pull the flower from the pot and drag it across your heat mat to try to get rid of the excess on the bottom. UTEE dries extremely fast, and you will more than likely have marks from your tweezers and other things. That's OK...because you can cut away any excess UTEE around the edges (after it cools a bit, but before it's completely dry) and then use your heat gun to re-melt the UTEE in places that left a mark. At this point, when it starts to cool, you can shape your petals. It is SO much fun to do. Because the clear UTEE turns an amber color after it's been in the pot a while, it will darken your paper, giving you really cool effects. I made two layers and used a glue dot to put the two pieces together. Some people like to use hot glue. I then punched a little flower for the center and dipped it in UTEE as well. Then I just added a purple crystal on top for the center. I used Spellbinder's Labels 25 for the background and sponged it with green ink while it was still in the die. The fancy flourish is from Cheery Lynn Designs. For my fibers, I used green Jute twine and made little loops and added them under the flower. I finished it off with green pearls.

Winter Wishes

This is my entry for Monday's Greeting Card challenge over at The Outlawz. The challenge this week for for snow or snow person.


For this card, I used my Silhouette Cameo and a Silhouette frame cut file. This particular cut file makes 3 cuts...the frame, the label, and of course, the negative. I removed the frame for this card and layered the negative cut on a white card stock base. I matched the size exactly from top to bottom, but left a little border on the left and right. The blue card stock is textured, and it's a new stack mat I just got from Joann's for $2.99...I love it. I then layered the label portion inside the negative, to give a white frame around the piece. I stamped the snowman from Gina K. Design's Celebrate the Season set, and the sentiment from Gina K. Design's Winter Wishes Stamp Duo. The snowman was colored with Copics and Spectrum Noirs. I cut the snowman out using Spellbinder's Classic Ovals Small and distresses the edges very slightly in black. I used pop dots to raise it a little and give it more shadow. The sentiment was stamped on white card stock, inked with a Spectrum Noir marker and then layered on black and popped up. The white snowflakes with blue crystals are from Jolee's Boutique.

Wednesday, January 16, 2013

You Make My Heart Sing

This is my entry for the Sunday CAS challenge over at The Outlawz. The challenge this week was Let's Make Music Together.


The music frame was cut using my Silhouette Cameo and the cut file is from their online store. I also cut the heart from the Silhouette and distressed the edges with black ink and then stamped the sentiment from Gina K. Design's Gleefully Yours set. The sentiment normally is on one line, but it was too big for the heart, so I broke it down into two lines using my stamp positioner. The bird is a black outline sticker from Elizabeth Craft Designs and I put it down so it's feet would be perched on the heart. I then colored it with Copic markers. I added a crystal for the bird's eye and then placed 3 small hearts next to the bird using a Fiskers hand-held punch.

Bad Moon Rising

This is my entry for Saturday's Paper Ala Mode challenge over at the Outlawz. This week's challenge was Favorite Things.


One of my favorite things to do with my cards is sponging. That's what I did for this card. My husband is really into night photography and he recently took a picture of the moon from our backyard that looked a lot like this, so I wanted to try to recreate it using stamps. I used a piece of white glossy card stock and 3 ink pads (Night of Navy, Barely Banana and Rose Red) from Stampin' Up!.  Using a finger dauber, I started with the banana and placed a circle where I thought the moon would be stamped. I then used the rose red lightly in a few spots on the card. I knew when I went over it with the navy, it would turn purplish. The rest of the card was done with navy. I went lightly in some spots and then heavier in others to get the darker look in some places. I then stamped Cloud with Crescent Moon from Stampscapes (another one of my favorite things) over the entire sheet. Next, I stamped completely around the edges of the card with two different stamps (Oak Branch from Stampscapes and a sprig stamp from Gina K. Designs). I layered this on black, barely banana and then night of navy as the base.

Making a Friend

This is my entry for Friday's Copic/Promarker challenge over at the Outlawz. The challenge was Winter Wonderland this time.


This image is one of the new digis I purchased from Doodle Pantry called Snow Birdie. Isn't it adorable? I thought it was perfect for this challenge. The image is colored with Copic markers (B0000, B00, B02 for the bird's body, BV00, BV02, BV04, BV08 for the hats and scarf, and Y17 and YR23 for beak, feet and cheese nose). The snowman and snow were first done with Sakura's clear glitter pen, but I didn't like how gray/silver it looked, so I added Stickles Frosted Lace glitter glue on top. It still looks a bit too gray for me, but it was better. I created the sentiment on my Silhouette Cameo using Comic Sans font and dotted the "i's" and the exclamation point with crystals I colored using BV04 Copic marker. I then added the glitter and gem snowflakes from Jolee's Boutique. I layered the image on a tiny sliver of black and then designer paper from my stash (it was loose, so I have no idea who it's from) and then purple card stock base.

Monday, January 14, 2013

Double Emboss Resist

This is my entry for the Twisted Thursday Challenge (Favorite Things) over at The Outlawz.


I used 2 of my favorite things for this card. My love of metal and creating my own embellishments. I don't know what the official name of this technique is, but I call it double emboss resist.  To create this card, you start by doing the emboss resist exactly as you normally would. Stamp your image on white card stock using Versamark, use clear embossing powder and heat it. I used a direct to paper technique to apply the 3 different ink colors, making sure I could see some of the marks. Now, for the double emboss part. Notice that there is no shine on the image. To get this effect, take another piece of white card stock and lay it on top of this one. Cover that with a sheet of typing paper and using a hot iron (no steam), iron the entire image. What this does is melt the embossing powder and transfer a reverse image onto the other card stock. IMPORTANT: Make sure you do NOT wipe off the ink after doing your first emboss resist effect. If you do, you will not have a reverse image on the other card stock. Neither piece comes out shiny. It's like the embossing powder just disappears, but you are left with 2 gorgeous pieces to create your cards. The second piece will be all white, except where you have your image...that will be colored with the inks you chose. I used a wire mesh on the side and made my own embellishments with a punch and card stock and metal. I heated the metal with my handheld butane torch to make it change colors before punching, and then placed a little crystal on the top of each one.

True Love Rose

This is my entry for the Wednesday Sketch Challenge over at The Outlawz.


This was a fabulous sketch. All of the embellishments on this card were handmade by me using resin and molds. The rose and dots at the bottom were poured with clear resin and after they were hard, I used Adirondack alcohol ink to color them. For the 3 bows, I mixed the clear resin with black acrylic paint and then poured into the molds to harden. I used Spellbinder's  Labels 25 for the center. To get the mat, I used the same die and placed it on black card stock and using a white gel pen, traced the outer edge, and then cut it out by hand. The sentiment is from Gina K. Design's Basket Additions set by Melanie Muenchinger. The card base is Calypso Red by Gina K., layered with Black Onyx and White Pure Luxury Layering Weight.

Thursday, January 10, 2013

I'm So Happy - DPDC30

This is my entry for the Doodle Pantry Digital Challenge. I found this site through Linda Weber's blog and I'm so excited. I've already made a wishlist of the images I want to purchase, but the first thing I did was go to her Freebies page and download the images she is so generously giving away. Isn't this one a beauty?


I fell in love with this little bird immediately. The sentiment is also from Doodle Pantry. I created the frame for the image using my Silhouette Cameo. I used the negative space of the cut file instead of the cut file itself. I thought it looked perfect for this happy bird. I colored the bird with Copic and Spectrum Noir markers. Added a butterfly bling and black metal bling. I layered this on black card stock and then a white card stock base. Just looking at this little bird makes me happy!

Tuesday, January 8, 2013

Blue Bird Birthday

This is my entry for the Tuesday Color challenge over at The Outlawz.


This little blue bird was cut on my Silhouette Cameo using a cut file I purchased from Silhouette's online store. This is actually a card cut file, but I cut off one end to make it a frame. I layered it on designer paper with multiple colors of blue. I used white craft ink to distress the bird, branches and leaves.  The Happy Birthday sentiment is also cut from my Silhouette. I layered the entire thing on white card stock and added a white pearl for the bird's eye and swirls of white pearls for dimension and texture.

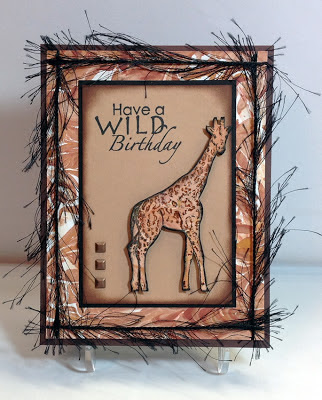
Wild Giraffe

This card is doing double duty this week. It is my entry for the Monday Greeting Card challenge over at the Outlawz, and also my entry for the Mix It Up Monday challenge over at Stamp TV.


The challenge for The Outlawz was to add brads and one new item. Well, the brads are my new item. I just got them and I love the beveled look of them. But, if that's not enough, the craft card stock is also new. The challenge for Stamp TV was to use distressing. This card was stamped using Gina K. Designs Wild About You set. I stamped the giraffe on paper that was created using the shaving cream technique. I actually did 2 giraffes, cut them out and glued one down and then popped the other one on top for dimension. I stamped the sentiment in black, added the brads and then distressed the edges with brown ink. I matted that on a sliver of black card stock and then layered it on a piece of card stock designed using shaving cream and ink. I used a corner punch to "notch" the corners and then used black fibers around the edges. I think it makes it look like I matted it on 2 pieces of shaving cream card stock. Lastly, I layered it on dark brown card stock. Thank you for looking.

Billboard Birthday

This is my entry for this week's Sunday CAS challenge over at The Outlawz.


This challenge was to use something new. I used a new cut file I purchased from Silhouette's online store specifically for this card. This is for my step father's birthday. He spent his entire adult life working for outdoor advertising, so I was so excited when I found this cut file. I cut it first in black and then in gray. I took the gray pieces of the lights and cut the tops off and placed them on top of the black lights. I used the gray insert to place the sentiment on and distressed it. I also placed ink on the gray paper below the lights to give it the effect of being lit. The Happy Birthday sentiment is another new cut file, and the name is one I typed and cut. All billboards have the name of the company underneath them, so I used white and black alphabet stickers, which I distressed with gray ink, and placed his initials in the space. Thank you for looking.

Engraving Art: Puppy and Kitten

This is my entry for this week's Saturday Paper Ala Mode over at The Outlawz.


Believe it or not, this is PAPER. My friend Penny sent this little craft kit to me, and I had the best time creating it. It is called engraving art, but it is basically scratch art. Each piece of paper has a color behind the top black layer, and you scratch the image using a little scratch tool that comes with it. The image is printed very lightly on top and you scratch it off. This one was copper colored under the image. I think it took me about 2 or 3 hours to complete it. It was so much fun. I also scratched a border around the image, and then placed it on black velvet paper and then framed it in this shadow box frame. It was extremely difficult taking the picture because of the reflection of the copper and the glass in the frame. It it so much prettier in real life. Thank you so much for looking.

When You Wish Upon A Star

This is my entry for this week's Friday, Copic/Promarker challenge over at The Outlawz.


This challenge was for something new...and what is more than than a little baby. This card was completed by printing out this adorable baby bear digi stamp. I colored the bear and the moon with various colors of Copic markers. I cut the image out with scissors and left a small white border around it. The sentiment, stars and flourish were cut using my Silhouette Cameo. I manipulated this particular cut file because it had too many tiny parts and didn't fit my page properly. That's one of the things I love best about the Silhouette. Thank you for looking.

Thursday, January 3, 2013

Brother and Sister Bonding Time

My little brother Steven came to visit us just after Thanksgiving and stayed until yesterday. He has always been excited about my cards and fascinated with my craft room when he's seen it. He decided he wanted to try his hand at making homemade cards for his girlfriend. The first two cards we made were a Christmas card for his girlfriend Cindee, and a birthday card for her daughter Lauren. Unfortunately, I did not get pictures of those cards before he left to go see her. The second set of cards we made, I did get pictures of and I wanted to share them with you now. We had a blast creating these cards together and although I helped him with some of the designs and more difficult things, he did the majority of the work on these cards himself.


 This first card was created using a beautiful pre-embossed card stock. I love the satin look of the trim around the edges. The Valentine stamp by Paper Inspirations was stamped and embossed with Cherry Cobbler embossing powder. Then layered on red glitter card stock and then black glitter card stock. For an added little touch, he put a little red crystal heart over the "i". The forever sentiment is from Stampin' Up! and was stamped in Cherry Cobbler ink and a black heart was placed next to it. The string of bling along the side was originally black and clear crystals, but I colored the clear ones red using a Copic marker. I think this is one of the prettiest Valentine's Day cards I've ever seen. I didn't get a picture of the inside because he had already personalized it, but it was equally decked out, as was the envelope. He really got into the glitter...lol.


This second card was created for her birthday, which happens to be the day after Valentine's Day...yikers! The focal image was cut on my Silhouette Cameo with a cut file purchased from their online store. This was glued onto pretty green glitter card stock, and then I trimmed around image. He then placed it on black and white polka dot card stock, green glitter card stock again, and then black card stock. The sentiment is a rub-on from Stampin' Up!. Again, the inside was stamped and glittered up, as well as the envelope. I can't wait until she receives these. I know she will love them.

Snow Much Fun

This is my entry for the Twisted Thursday - Snow People challenge over at The Outlawz.


The complete snowman was created using a cut file on my Silhouette and then distressed and assembled. I layered him on Gina K. Design's designer series paper Blizzard. I used a teal color card stock and cut it using a mega oval from Spellbinders to make it look like a skating rink. I used flower soft to give the look of a snow bank and then added glossy accents to make it look like he's skating on ice. The stamp is from Stampin' Up!'s Snowy Play set. I added crystals in the center of the snowflakes on the sentiment.

Magenta Flower Petals

This is my entry for the Wednesday Sketch challenged over at The Outlawz.


This card was created using a petal stamp set from Heartfelt Creations. The petals were stamped on shimmery vellum paper and then heat embossed to add color and texture. I have the dies to cut the petals, but when I do this many, it goes faster when they are cut out by hand. I make 12 petals of each of these 3 sizes. I lay 6 of the largest petals first, then the other 6 in between. Do this for the medium and then the small petals until you have your flower built. I use a flat glue dot for each layer. If you use the dimensional glue dots, your flower will be very mushy and move around. For this particular center of the flower, I use a crystal and surrounded it by 6 pink marquise crystals. I mounted the flower on shimmery white card stock and then magenta card stock. I then used 3 pink crystals in each corner following different directions. I love making these flowers. Thank you for looking.

Wednesday, January 2, 2013

Floral Birthday

This is my entry for Tuesday's Color Challenge over at The Outlawz. This challenge was to use Melon, Lt. Blue and Lt. Turquoise.


I used this stamp from Gina K's Arranged With Love set. Everything was colored with Copic markers and Spectrum Noir markers. The stamp has a natural black border and then I mounted it on melon, turquoise and white card stock  Added a little bling under the sentiment to finish it off.


Autumn Vines

This is my entry for the Monday Greetings Card challenge over at The Outlawz.


I love the vintage look of this card. You may not believe this, but both the frame and the sentiment are rub-ons. I used vanilla card stock distressed with green and brown ink. The frame with vines was rubbed on first, and then the sentiment was rubbed on top of it. I didn't know if it would work or not, so I was pleasantly surprised that it did. I layered it on a sliver of black card stock and then green. Added some green pearls to finish it.

New Year Toast

This is my entry for the Sunday CAS challenge over at The Outlawz.


This card was created using Dazzles from Paper Wishes. The champagne glasses are black glitter and silver. I added the bubbles and the bows from the same package of stickers. The sentiment is from a silver glitter alphabet sticker package. See if you can tell which "P" used to be an R and which "E" used to be an F. I had to get creative.