Sunday, April 28, 2013

Pear-fect Friend

Here is another card I created with the April release of Pears & Raspberries Color Plus from Doodle Pantry. I absolutely love this set.


For this card, I took two of the pre-colored pears and put them together. I then removed one of the leaves. Everything was pre-colored for me, and the background paper is from this set too. I layered that with lime green and then a white card stock base. I used the lacy ovals from Spellbinders and then free-hand cut the scalloped background behind that. The sentiment is also from this set and that was just cut into a rectangle and sponged lime green ink around the edges.. I added acrylic green flowers for my bling.


Friday, April 5, 2013

Treasured Friend

It's time once again for a fabulous new release from Doodle Pantry. I am so excited to once again be able to show you what Laurie has created for us this month. There are only a few items being released today, but there will be another release in the middle of the month, with even more fabulous digital stamp sets for you to play with.

I chose the new set called Old Trunk for my sample card. Look at all these amazing images you get with this set.


And here is the card I made:


I went with a treasured friend theme for this card. I also used the pre-colored version of the trunk image. I normally do my own coloring, but Laurie did such a fantastic job on this trunk, I didn't want to change a thing. The designer paper in the background is also from this set. I absolutely LOVE her digital designer papers. This was layered onto a white card stock base. The frame was cut on my Silhouette Cameo and is from the Silhouette online stored. I cut 4 thin strips of rust paper and weaved it through the slots. I glued this onto white card stock and then onto rust card stock. I deliberately left only the sides of the rust card stock showing. I printed 2 of the trunk images. I left one on white card stock and layered that onto rust card stock and then black card stock to go into the center of the frame. I popped the 2nd trunk image up and draped a short strand of pearls (this was glued down in several places) over the side and added jewels around the bottom and side of the trunk. I also added very small black gems on the top of trunk to mimic the rivets. The sentiment is also from this wonderful set and I cut it with Spellbinder's classic ovals and layered it on rust. I finished is off with clear jewels all around the oval.

A new digital challenge will also begin at noon today and run until April 24th over at the Doodle Pantry blog. The rules are simple...just use a Doodle Pantry image, not just a sentiment, and enter your card using the inlinkz button. There are lots of images on Doodle Pantry's Freebie page. Just for entering the challenge, you will receive the Berry Nice Mice set free. Here is a picture of that set.


Always look on Doodle Pantry's Specials page before checking out. This month, the free with purchase set is Flip Flops. But you need to hurry, it is only free with purchase until April 24th. 
 

And if that's not enough to get your creative juices flowing, there is a 3 day special being offered:

APRIL 5th - 7th ONLY - 30% OFF your total cart contents when you spend at least $6.00

HOW TO REDEEM:  Make sure there is at least $6.00 worth of products in your cart first
  1. Login to shop or register
  2. View cart and scroll to bottom of cart
  3. Enter coupon APRILSHOWERS in the coupon field and CLICK SUBMIT to see the discount get applied
  4. Continue your checkout and pay
I hope you all enjoy this fun new release as much as I do! Please stop by my fellow design team members pages and see what they have created. You will find the links to their blogs on the right-hand side of my blog.

Saturday, March 23, 2013

Eggshell Froggy

This is my entry for the Twisted Thursday challenge over at The Outlawz. The challenge is anything goes, with a twist of first signs of spring.


This is another fun digital stamp from Doodle Pantry. This time I used the Easter Frog Pals set for my card. I think it's just one of the cutest images, especially for Easter. I covered the broken egg with real eggshells (they need to be boiled and the membranes removed and left to dry completely before using). I colored the eggshells with Copic markers (Y04, V12, G02, RV13 and B02 ) and covered them with glossy accents to make them shine and to smooth out any sharp edges from the eggshells. I also colored the froggy with Copic markers (G12, G14 and G16) and the beak (Y15, Y17 and Y19). I cut the entire image out after the glossy accents dried. I used a wobble on the back of the froggy and eggshells so it moves and mounted it on a Spellbinder's Labels 16 and then a flourish cut file from Silhouette. This was layered onto white card stock (distressed with So Saffron) and then on pink card stock and then a white card base. I added glitter sticker bling to finish off the background.

Oops, I forgot to mention the green, eye-lashed googly eyes...what a perfect match they were and fit perfectly into the eyes Laurie drew for this lovely frog!

Also entered in the following challenges:


Thursday, March 21, 2013

Through the Wringer

This is my entry for Monday's Greeting Card challenge over at The Outlawz. This week the challenge was to Layer It Up!


These fun digi stamps are from Doodle Pantry. I actually merged the two digi stamps from two different sets. The worm is from an older set called Hang in There and the tub with wringer is from one of her brand new sets Washin' Board. If you go look at the Hang in There set, you will notice that the worm is surrounded by grass. I removed everything surrounding the worm using Fireworks. Notice he has a great big knot in his body...isn't that so cute? So, to merge these two digi stamps together, I cut the worm in half at the base of the knot. I rotated the front of the worm until he looked like he was coming out of the wringer. I then lined up the back of the worm with the front and then using the software, I sent it backwards. What this does is make the wringer show up in front of the back of the worm. Notice you can still see a bit of the knot...like he's stuck. These two images couldn't have worked out better together. I printed the image twice. I colored the entire image on the base using Copic markers (E40, E42, E43 for the roller; E11, E13, E15 for the worm; and E25, E27, E29 for the tub), and then colored the worm and the wringer and the towel on the second image and cut them out. The worm and wringer were cut as one piece. For the towel, I first colored it with E11, so no white would show, and then I flocked the whole thing with Pumpkin Orange flock. I layered both of these pieces on the base image for dimension. The trim on the tub and the handle is Sakura clear glitter pen. The sentiment is one I made up and printed using Comic Sans font. I distressed the edges and corners using apricot ink from Stampin' Up! and layered it on brown and apricot card stock and used a white card stock base.

Also entered in:


Tuesday, March 12, 2013

Doodle the Puppy

This is my entry for Saturday's Paper Ala Mode challenge over at The Outlawz. This challenge is anything goes...my favorite type of challenge.


I think this is one of my favorite cards I've ever made. It was so much fun. The puppy, who I affectionately named Doodle, is from the digital image set called Puppy Presents from Doodle Pantry. You can get this set free with purchase until March 24, 2013. How fabulous is that? He was colored with Copic markers (CO - the bone, E40, E42, E43, E44 and E47 - the puppy, C4 and C9 - puppy's nose).

The actual dog house is a cut file from Silhouette's online store. I created the black outline myself in the Silhouette software. I ran the dog house through a wood grain embossing folder from The Paper Studio. I added the antique copper metal heads in the place of nails. The dog house was distressed with Chocolate Chip and Close to Cocoa ink from Stampin' Up!. I cut the sign (part of the dog house cut file) on my Silhouette and distressed it with Chocolate Chip ink. I cut the dog's name (Doodle) on my Silhouette using a free font called SBC Love Mom and black card stock. Used very tiny black brads to nail it to the dog house.

To create the base of the card, I used a tan card stock folded in half and then cut it to fit with a small border around the bottom and sides of the dog house. For the rest, I hand cut it around the roof of the doghouse. So, the card base is shaped like the dog house from behind, without the side points.

Again, so much fun with this image!

Also entered this card in:


Monday, March 11, 2013

Navy ROTC - Twins

This is my entry for the Twisted Thursday challenge over at The Outlawz. The twist this week is to play bingo...I got a diagonal bingo with Die Cuts, Designer Paper (made myself) and Distress Inks.


Why are there two cards, you may ask? Because they are for my twin nephews' birthday. I always end up making the same card for them, but I change it up a little...this time I changed the colors. Let's start with the anchor. Both the anchor and the frame it is sitting in were made by me using resin, molds and acrylic paint. I use the paint to change the color of the resin to whatever color I want. The anchor is one piece, but is done in two stages. The first pour is the anchor portion, you let it dry and then pour the backing. The frame is a separate mold.

I need to give a shout-out to my friend Vicki Dutcher. She made this awesome card for her son and introduced me to Tagxedo where I made the background for these cards. You can make all kinds of backgrounds in all kinds of shapes. My nephews are in the Navy ROTC at UVA...so I used those three words, plus proud and awesome...because I am so proud of them and they are AWESOME young men. The card on the left was done in black and printed on ivory card stock. The card on the right was altered by me in Fireworks. I changed a number of the letters to various shades of gray, along with the black.

I used a Spellbinder's die for the backing and cut the battleship on my Silhouette Cameo. The image is from their online store. It came with water and a shadow, but I removed those and cut just the ship. Everything was distressed with either black or gray ink. The letters USN are stickers. They were gold, but I colored them with a black sharpie. Finally, I added silver metal bling for interest. I really hope they like them.


Sunday, March 10, 2013

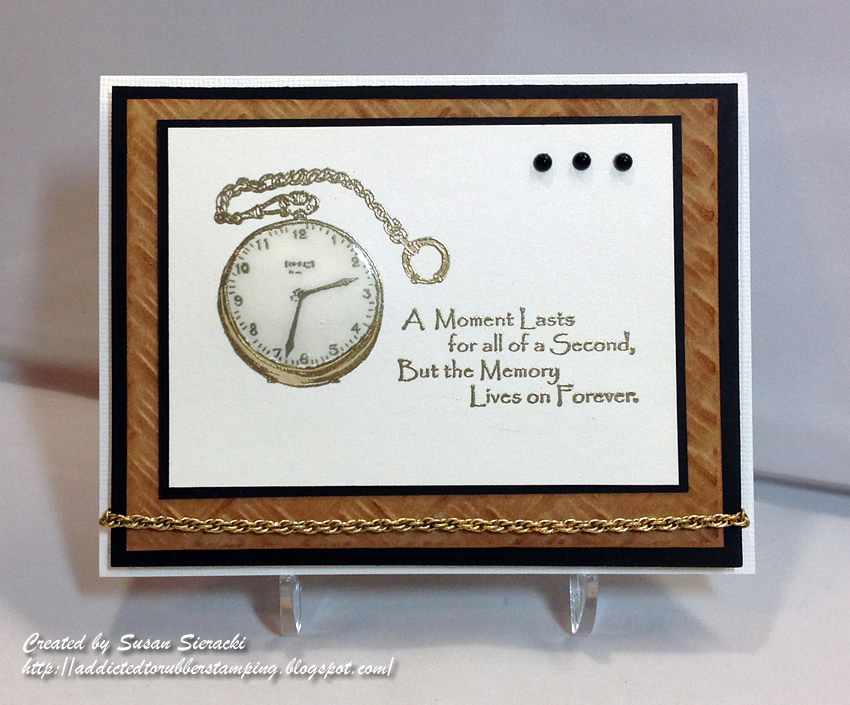
Pocket Watch

This is my entry for the Tuesday Color challenge over at The Outlawz. The challenge colors were black, white and tan and the twist was make it vintage.


All of the stamps used on this card are from Gina K. Designs. I used the Timeless Treasures set, which has been retired. The pocket watch and sentiment were stamped with Versamark and embossed with mirror gold embossing powder. I colored the bottom part of the watch with Copic marker Y28. I used glossy accents to fill in the face of the watch and give it a glass appearance. The tan card stock background paper was made with Spellbinder's M-bossabilities Basket Weave embossing folder. I used 3 inks to distress it (Creamy Caramel, More Mustard and Close to Cocoa - all from Stampin' Up!). I wrapped a piece of an old gold tone chain I found in my stash around the tan card stock to mimic the chain on the watch. Added 3 black pearls to finish the card off.


Monday, March 4, 2013

Indoor Plumbing

This is my card for the Saturday Paper Ala Mode challenge over at The Outlawz. They used an inspiration picture for the challenge this week.


For this card, I used the Pitcher & Basin set from Doodle Pantry. I printed the pitcher and basin on heavy weight white card stock and colored it using Copic markers (B32, B34, B41 and B91). The triangle doily is a cut file from Silhouette of America.  I hand cut the pitcher and basin and popped it up on the doily. The designer paper and sentiment are also from the Pitcher & Basin set. I mounted the designer paper on black card stock and then placed it on a white card stock base.

Also entered in MFP Friends of Speedy TV #62


Sunday, March 3, 2013

Batter Up

This is my entry for the Twisted Thursday challenge over at The Outlawz. The twist this week was to make a sports theme card.


As soon as I saw the challenge, I knew what images I would use. This is actually 3 images from Doodle Pantry's Baseball set. Isn't it adorable? This was very easy to add all 3 images to a Microsoft Word file and size and arrange them the way I wanted them and then print it out. The image was colored with Copic markers (Y35, Y38,Y04, Y08, E35, E39, R24, R27, B95 and B97). The baseballs are metal brads, but I removed the prongs and used a pop dot to secure them to the card. I stamped a "D" and a "P" on the uniforms of the birds with a tiny alphabet stamp set from Personal Stamp Exchange. 


Saturday, March 2, 2013

Wishing You Well

This is my entry for this week's Monday Greeting Card challenge over at The Outlawz. The twist this week was to use bling!

All images on this card are from Doodle Pantry.  For this card, I am using two of Laurie's sets...her Lily Collection set, which has been re-released this month to include colored images, and her Watering Can set, which is free with purchase. I used 3 of the images from the Lily Collection to create this assortment. It is really easy to put images together and bring some forward and push some backward in your software to give you a natural masking effect. The Watering Can was altered by removing the lip of the can. Although I did this using my software, it would also have been easy to do by just cutting it away. It left a little gap of space behind the flowers, but I just used a micron pen to make a couple of dashes to close the can. The images were then colored with Copic markers. I used Spellbinders labels large and small to cut out the focal image. The sentiment is from the Watering Can set and was punched using a Stampin' Up! label punch. The beautiful designer paper is from the Lily Collection. I love how vibrant it looks. This is actually my first time printing my own designer paper from a digital image, and I couldn't be happier. Laurie's papers are just beautiful. I added a sheer ribbon and then added green bling across the top of the ribbon.

Also entered into Simon Says Stamp Challenge